How to Install Our Scope Mounts

How to Install Our Scope Mounts
You need to mount your scope to your gun, but how?
There are many different options, but one of the most common ways to get your glass on your gun is by using an accessory rail.
Which one should I choose?
Well, a Picatinny rail of course.
Picatinny rails have a standardized set of dimensions which allow manufacturers to make rails and rings that will play nicely with other Picatinny products.
These include cross slot width, length, and spacing. There are other options on the market, but we like Picatinny.
Our scope mounts are fairly simple to install. Most only require a few screws to successfully mount them. We provide the mounting screws and either a bit or wrench with our scope mounts to assist in the installation.
Most of our Standard Duty and Heavy Duty rails come with an overhang. This is meant to point down range (there are a few exceptions, like our Ruger No.1 mount).

These distances, commonly referred to as "spreads", can be used to confirm that you are purchasing the correct rail for your application.
We offer a few different series of mounts. You can find more information about them here.
Step 1: Remove any bases that are currently mounted on the receiver
This is pretty self-explanatory. Remove anything in the way of mounting your new EGW mount.
Step 2: Clean the receiver and the mounting holes
We recommend using a firearm-safe cleaner/de-greaser to remove any residue from your old mounts. Use a Q-tip or cleaning implement to clean out the holes in your receiver.
It is VERY common that debris from the manufacturing process is left in the holes. Tikka T3s typically have plastic plugs that leave behind debris that can keep the mounting screws from being installed.
We have also found that newer Savage rifles commonly require a bottoming tap be run through the threads to chase them.
Step 3: Install the mount
Place the mount on your receiver. Make sure the mounting holes line up with the holes in your receiver.
Test fit your mount to make sure the screws are able to be turned into the receiver and that they do not cause any interference with your bolt.
Hardware Installation Steps:
- Set your torque wrench to the proper setting. We recommend 20 in/lbs on most of our mounts. The torque specs can be found on the product page for your specific item or on the back of the card that came with your product.
- Place a small amount of blue thread locker on each mounting screw. Excessive use of thread locker may render your bolt inoperable.
- Insert the screws into the mount and thread them into the holes. Make sure to torque them to the proper torque setting.
Step 4: Install your rings
This step may vary based on the type of rings mounted and where you need to mount your scope to attain the proper eye relief. Loosen the nut or screws on the clamp side of your rings. We like to mount our clamp on the opposite side of the ejection port when conditions allow.
Set your rings on the cross slots of our rail. Remove the top cap on each ring (if that is the style ring you are using) and place your scope in the bottom half of the ring. Place the top caps on top of the scope and loosely secure the screws.
Positioning and Adjusting Eye Relief:
- Shoulder the rifle in the position you will most likely be using it in. Prone positions typically require the scope to be moved further forward, but this does depend on the available eye relief for each scope.
- Move the scope to the position that works best for you. You may need to move the rings forward or backward in the cross slots at this point.
- Once you have found an acceptable position, push the rings forward in the cross slot to take up any play that may be present. Now, tighten the nuts or screws to the appropriate torque setting.
At this point, you should level your scope and make sure you have the proper eye relief. There are plenty of videos and write ups on the varying ways to do this. Use what works best for you.
After leveling the scope, make sure the top caps are tightened to the appropriate torque setting. You are now ready to hit the range!
What kind of rings can I use? Weaver or Picatinny?
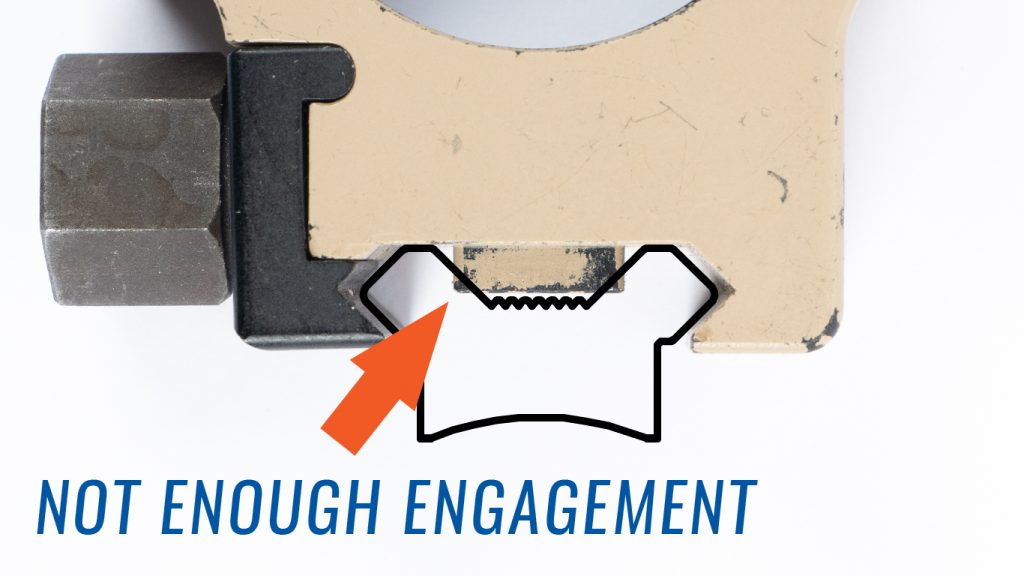
Weaver or Picatinny style rings will work on our scope mounts, but we do NOT recommend using QD (Quick Disconnect) rings or rings with just a center lug, on our Standard Duty mounts (Figure 1).
The valley down the center of our mount does not allow for enough engagement when used with QD rings. This combination may cause damage to the rail under heavy recoil.
We recommend using Weaver or Picatinny rings with a full crossbolt on our Standard Duty bases. This allows for optimal engagement (Figure 2).
Our Premium Ring Options:
- Our Keystone Rings offer an affordable, U.S. made alternative to the imported rings commonly available on the market.
- Our Heavy Duty Rings are machined as a pair and are serialized. They are our premium rings for when only the best will do.


Newest Guide & Blog Updates

How to Verify Ruger No.1 Scope Rail Fitment Before Ordering
Ruger No.1 Scope Rail Fitment Guide How to use the EGW Ruger No.1 Radius Gauge and Hole Spacing Gu...

Marlin 1895 Mounting Solutions: The Ultimate Guide to Modernizing Your Lever Gun
Marlin 1895 & Henry Lever Action Mounting Solutions: Picatinny Rails, Scope Mounts & Red Dot Option...

Springfield Prodigy Mag Catch Upgrade - EGW HD Machined Tool Steel
Springfield Prodigy Mag Catch Upgrade: EGW HD Machined Tool Steel The ultimate upgrade for reliable...

Why Fully Machined 1911 Ignition Components Outperform MIM
The Heart of the Crisp Break: Why Fully Machined Ignition Components Outperform MIM In the world o...

EGW CZ Scope Mounts: Converting Dovetail Rails to Picatinny
EGW CZ Scope Mounts – Why CZ Dovetail Rails Are Different (and Why Shooters Love Them) CZ rifles ha...

Is Your Shotgun Ready for Spring Turkey?
Gear Up for Gobblers: The Ultimate Guide to EGW Turkey Hunting Parts "The margin for error in the tu...